Official Luthiers Forum!

Owned and operated by Lance Kragenbrink
It is currently Fri Jun 27, 2025 9:47 am


All times are UTC - 5 hours


Post new topic Reply to topic  [ 14 posts ] 
Author Message
 Post subject:
PostPosted: Tue Jul 11, 2006 8:35 am 
Offline
Contributing Member
Contributing Member
User avatar

Joined: Fri Nov 11, 2005 3:32 am
Posts: 2687
Location: Ithaca, New York, United States
I've just completed the rosettes for these two little guitars I'm making (call 'em double course steel string tenor ukuleles, or double course alto guitars). One is bubinga with maple and black fiber purfling, and the other is koa with koa and black fiber purfs. Here they are:


A technique I learned and use for gluing in rosettes is to dry fit them and wick in CA. Along with wicking it in from the top, I've drilled several holes through the top, in the rosette channel, before putting the rosette in place, and then wicked in CA though the holes from behind. For the most part, I'm very happy with this method. Here's my little problem:

Due to the variation in the thicknesses of purflings, I'm finding it difficult to get an absolutley perfect fit of the rosette w/ purfs in the channel I've cut. I'd like them to be just about as tight as I can fit them in there, but on both of these, they were snugish, but not quite as tight as would be ideal. The result is VERY TINY gaps in a couple places around the purfs. You have to look really closely, but it's definitely not as perfectly clean a look as I want.

Here's what I'm thinking: CA doesn't cause the wood to swell at all. I wonder if I could do the same dry-fit-then-wick-in-glue method using watered down PVA (yellow or white) glue instead of CA. I figure this would make the wood swell and turn even a sloppy fit into a nice and tight fit, which would then make a nice clean line when scraped/sanded back. Does anyone use this method? Any other helpful thoughts on the subject?

One thing I'm wondering about is getting a glue-splotchy look around the rosette. I wonder if watered-down PVA glue would penetrate the spruce fibers and then look different under finish than the surrounding areas. I'm even thinking now of trying to close the tiny gaps by wicking in a little watered-down glue, but I'm hesitating for this reason. It occured to me to just wet the spruce a bit with water, but even if this caused the fibers to swell and close the gaps, it seems that they would likely open up again when it dries out.

What do you think? Thanks.


_________________
Todd Rose
Ithaca, NY

https://www.dreamingrosesecobnb.com/todds-art-music

https://www.facebook.com/ToddRoseGuitars/


Top
 Profile  
 
 Post subject:
PostPosted: Tue Jul 11, 2006 10:46 am 
Offline
Koa
Koa
User avatar

Joined: Mon Jan 03, 2005 2:40 am
Posts: 993
Location: United States
Todd,

Very nice looking rosettes! As far as getting them a little tighter, you can go ahead and wick as usual, but just take a damp sponge and wipe down the purfling when you're done. That will cause the purfling to tighten right up. Also, you should put a wash coat of shellac or lacquer in your rosette channel before wicking, otherwise you run the risk of the CA glue wicking down the grain of your nice spruce top. Also, it shouldn't be necessary to drill holes to wick through. It should hold just fine wicking through the top and sides. Below are some links to threads where I show my rosette process. I actually use gorilla glue for the purfling because it swells up real nice and pushes everything tight as well as fills in any small gaps. Between that and the damp sponge, you will never have a gap in your rosettes.

Cheers!

John

rosette procedure

rosette procedure

rosette tile proc


Top
 Profile  
 
 Post subject:
PostPosted: Tue Jul 11, 2006 11:26 am 
Offline
Contributing Member
Contributing Member
User avatar

Joined: Wed Jan 05, 2005 3:45 pm
Posts: 4337
Location: United States
Todd, those are handsome rosettes, and that's some wonderful spruce, too.
I have used both CA and white glue, but mainly the water-based glue. (I like how it swells things shut.) I've never sealed the top (beforehand) when using the PVA glue. Just wiped the area down with a damp rag to clean the excess glue off. And, I've never had a problem with staining.

Of course, the finish will fill in some, and those black bands will be your friends, as they minimize any gaps.

Steve

_________________
From Nacogdoches...the oldest town in Texas.

http://www.stephenkinnaird.com


Top
 Profile  
 
 Post subject:
PostPosted: Tue Jul 11, 2006 2:36 pm 
Offline
Brazilian Rosewood
Brazilian Rosewood

Joined: Sun Dec 25, 2005 6:32 am
Posts: 7774
Location: Canada
Todd, John's advice sounds great and i might do just that on my next rosette, Thanks John for your threads on this!

Concerning yellow PVA, i used it on my first and had the desired effect but i must admit i was a little scared at first but it went well so, just a thought!


Top
 Profile  
 
 Post subject:
PostPosted: Wed Jul 12, 2006 1:22 am 
Offline
Contributing Member
Contributing Member
User avatar

Joined: Fri Nov 11, 2005 3:32 am
Posts: 2687
Location: Ithaca, New York, United States
Thank you, John and Steve, for your very helpful replies -- and Serge for your good-natured encouragement. And thanks for the positive comments about the rosettes. The photo doesn't do justice to the bubinga - it's that super-figured stuff LMI has. Both guitars will have headplates to match the rosettes.

That's spruce that I got from Brent Cole. The bears got to it real bad...

Anyway, John, now that the rosettes are essentially done, i.e. the glue is hard and they're all scraped and sanded flush, do you think it would still work to wipe them down with a damp cloth at this point? If they swell now and close the gaps, might the gaps just open up again when the wood dries out?

Steve, using white glue, do you dry fit the rosette and then wick in the glue? If so, do you water down the glue to make it wick in?

Both of your responses are making me think that maybe the best thing now would be to wick/wipe in some PVA glue size. As long as I won't have glue splotching (Steve, if I do, it will be all your fault!), it would seem that having the glue in the fibers as they swell would hold them that way when it dries.

Comments, anyone?

_________________
Todd Rose
Ithaca, NY

https://www.dreamingrosesecobnb.com/todds-art-music

https://www.facebook.com/ToddRoseGuitars/


Top
 Profile  
 
 Post subject:
PostPosted: Wed Jul 12, 2006 3:40 am 
Offline
Koa
Koa

Joined: Sun Jun 12, 2005 9:38 am
Posts: 1059
Location: United States
I have used Titebond and epoxy to glue in rosettes. I like epoxy because it has natural gap-filling properties, but it is a bit more of a chore, due to clean-up.

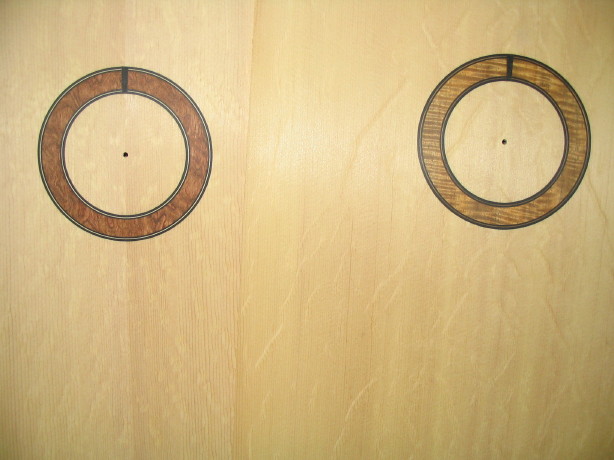
One of these days, I'll start making my own classical rosettes, but until then, I buy my rosettes from LMI. I have found that they are not always perfectly round, however, and as a result, sometimes the measurements I take for diameters, when used to cut the channels, result in gaps. So on a few occasions I've had to add purfling lines to the inside or outside of the rosette.

When I have to do this, I use "T"-shaped pins I found at an arts/crafts store to hold the purfling lines in place, pushing the pins down into the rosette channel. Here's a shot of the rosette channel with purfling held by pins on a steel string I built:


I know, I know -- the photo shows a couple of newbie mistakes. Like cutting the soundhole and bracing the top before installing the rosette. I managed to recover from them though.

Anyway, I use thin CA to glue down the purfling when I do this. Always, always, give the rosette channel and the edges of the soundboard wood a few good coats of shellac before doing this. I ruined a good cedar top on an earlier guitar because I forgot.

Regarding using watered down glue, I use this technique quite a bit with Titebond when gluing in the top and back purfling because I prefer to install the binding first. I like John's idea of using a sponge. I usually use a glue brush.

For gap filling I usually use medium CA. I really don't care for the way it darkens the fill, though, so I have also started using LMI white for gap filling and then sometimes going over this, if necessary, with medium CA. It's a bit more work, but the results are a somewhat better.

Best,

Michael
Michael McBroom38911.3917824074

_________________
Live to Play, Play to Live


Top
 Profile  
 
 Post subject:
PostPosted: Wed Jul 12, 2006 4:03 am 
Offline
Walnut
Walnut

Joined: Wed Jul 12, 2006 3:51 am
Posts: 1
Location: United States
Hi Todd,
   I've been sealing the rosette and purfling area with shellac before routing for trim. Is reduces tear out a bit while routing but more importantly prevents glue from penetrating/staining wood adjacent to the trim.


Top
 Profile  
 
 Post subject:
PostPosted: Wed Jul 12, 2006 6:08 am 
Offline
Contributing Member
Contributing Member
User avatar

Joined: Wed Jan 05, 2005 3:45 pm
Posts: 4337
Location: United States
[QUOTE=Todd Rose]
That's spruce that I got from Brent Cole. The bears got to it real bad... [/QUOTE]

Todd, I got some of his BC spruce at this last GAL convention, and the bears got to mine pretty bad, too!


[QUOTE=Todd Rose]
Steve, using white glue, do you dry fit the rosette and then wick in the glue? If so, do you water down the glue to make it wick in? [/QUOTE]

The only dry-fitting I do is to make sure that the rosette is a good fit... i.e., it won't take a hammer to install. When satisfied, I squiggle good old undiluted Elmer's white glue in the channel, and then quickly install the rosette. There might be the need for pressure from a tool handle, etc. Of course, this forces out the glue onto the top, which is then wiped off with a damp rag.

[QUOTE=Todd Rose]

Both of your responses are making me think that maybe the best thing now would be to wick/wipe in some PVA glue size. As long as I won't have glue splotching (Steve, if I do, it will be all your fault!), it would seem that having the glue in the fibers as they swell would hold them that way when it dries.

Comments, anyone? [/QUOTE]

That's what I'd try, Todd. And keep your damp rag handy.
(That'll be my disclaimer, by the way.)

Good luck,

Steve

_________________
From Nacogdoches...the oldest town in Texas.

http://www.stephenkinnaird.com


Top
 Profile  
 
 Post subject:
PostPosted: Wed Jul 12, 2006 6:38 am 
Offline
Contributing Member
Contributing Member
User avatar

Joined: Fri Nov 11, 2005 3:32 am
Posts: 2687
Location: Ithaca, New York, United States
Thanks, Michael and Dick, for your input.

As far as preventing CA bleeding into the spruce and causing discoloration, what I was taught to do is spread some CA kicker along the spruce edges (on the top surface) around the rosette (both the inner and outer circumferences) before wicking in the CA. That way, when the CA hits the spruce, it instantly hardens before it penetrates. I have had no problems with discoloring of the spruce using this method. Still, I like the suggestion of using shellac instead, and may try it that way next time.

As for tear-out... I use a 1/8" downcut spiral bit in my trusty PC 310 to rout the outer edge and inner edge of my rosette channel. Then I hog out the rest with a 1/2" straight bit. I get a perfectly clean edge to my channel this way -- no tear-out, no fuzz to clean up. But, again, I like the idea of shellac as an added insurance, and will try this.

BTW, I made a clean-looking splice in the top of my rosettes, because these instruments will have bolt-on, adjustable necks. Without getting TOO fussy, I wanted to make something that would just look reasonably neat when the neck is taken off. After dry-fitting the rosette and purfs, I trimmed them off cleanly with a chisel. Then I filled the space with ebony dust and thin CA. Next time I think I'll try black-dyed epoxy or black medium CA (from Stewmac) for that fill. Filling a space that big with dust and thin CA works, but it's messy and a bit tricky -- I get little voids that then have to be re-filled. Plus, I'm looking for ways to use less CA in general; I wear a respirator and ventilate the shop, but still the darn stuff burns the old eyes.

_________________
Todd Rose
Ithaca, NY

https://www.dreamingrosesecobnb.com/todds-art-music

https://www.facebook.com/ToddRoseGuitars/


Top
 Profile  
 
 Post subject:
PostPosted: Wed Jul 12, 2006 6:42 am 
Offline
Contributing Member
Contributing Member
User avatar

Joined: Fri Nov 11, 2005 3:32 am
Posts: 2687
Location: Ithaca, New York, United States
Thanks, Steve!

_________________
Todd Rose
Ithaca, NY

https://www.dreamingrosesecobnb.com/todds-art-music

https://www.facebook.com/ToddRoseGuitars/


Top
 Profile  
 
 Post subject:
PostPosted: Wed Jul 12, 2006 10:31 am 
Offline
Koa
Koa

Joined: Sun Jun 12, 2005 9:38 am
Posts: 1059
Location: United States
Since we are now discussing rosette installation, I thought I'd share a pic of a couple of tools I use for installing rosettes in my classicals.


I use the tool on the right to cut the inner and outer edges of the rosette channel to prevent tearout and fuzzing from my router bit. I have a nice downcut spiral bit, but I still get some fuzz with spruce and occasional light chipping with cedar. Cutting lines eliminates this altogether. I built it out of a few pieces of various sizes of doweling (1/4", 5/8", and closet rod), a couple of threaded inserts, a scrap of EIR, and an old jigsaw blade that I filed down and sharpened for the cutter.

The tool on the left is my rosette clamp. It has one of those threaded inserts on the back side that you can just tap in place with a hammer. I have a 1/4" hole drilled at the soundhole center on my workboard, and I just run a bolt up through the back of the workboard, then spin the "clamp" down onto the bolt after I've glued the rosette in place. I cover the rosette with waxpaper so squeeze out won't stick to the clamp, er, caul, or whatever you want to call it. The clamping action I can get from tightening this piece down on the screw is enough to seat just about anything.

Best,

Michael

_________________
Live to Play, Play to Live


Top
 Profile  
 
 Post subject:
PostPosted: Wed Jul 12, 2006 1:15 pm 
Offline
Contributing Member
Contributing Member
User avatar

Joined: Wed Jan 05, 2005 3:45 pm
Posts: 4337
Location: United States
Michael, that's a clever "clamp".
Thanks for posting.

SK

_________________
From Nacogdoches...the oldest town in Texas.

http://www.stephenkinnaird.com


Top
 Profile  
 
 Post subject:
PostPosted: Wed Jul 12, 2006 9:05 pm 
Offline
Contributing Member
Contributing Member
User avatar

Joined: Fri Nov 11, 2005 3:32 am
Posts: 2687
Location: Ithaca, New York, United States
Thanks, Michael. I take it you use that cutting tool by hand, right?

_________________
Todd Rose
Ithaca, NY

https://www.dreamingrosesecobnb.com/todds-art-music

https://www.facebook.com/ToddRoseGuitars/


Top
 Profile  
 
 Post subject:
PostPosted: Thu Jul 13, 2006 12:16 am 
Offline
Koa
Koa

Joined: Sun Jun 12, 2005 9:38 am
Posts: 1059
Location: United States
Todd,

Yup. I drill a 1/4" hole at the soundhole center for it to sit in. One thing I failed to mention -- those washers holding the blade in place serve two functions. Not only do they hold the blade in place, but they keep it from flexing as it transitions from cutting with the grain to across it.

Best,

Michael

_________________
Live to Play, Play to Live


Top
 Profile  
 
Display posts from previous:  Sort by  
Post new topic Reply to topic  [ 14 posts ] 

All times are UTC - 5 hours


Who is online

Users browsing this forum: No registered users and 13 guests


You cannot post new topics in this forum
You cannot reply to topics in this forum
You cannot edit your posts in this forum
You cannot delete your posts in this forum
You cannot post attachments in this forum

Jump to:  
Powered by phpBB® Forum Software © phpBB Group
phpBB customization services by 2by2host.com